Bozobooks.com: Fullstack k8s application blog series
Ingress & TLS/HTTPS with nginx, cert-manager & Vault
Chapter 8: In this blog, we will configure our ingress to use TLS/HTTPS, to access our web application. To generate the certificates we will use Vault, and then to manage certificates we will be using cert-manager
Architecture
Ingress exposes the services, that we are built to the outside world. It provides the HTTP and HTTPS routes, that are defined by the ingress resource. To provide a secured connection, HTTPS/TLS is used, and for that, we will need to integrate ingress with a certificate authority (CA). The certificates that are issued by CA, also need to be managed. Jetstack’s cert-manager provides a Kubernetes native framework to manage the certificates and integrates with Ingress. For CA, we can use Let’s Encrypt, Hashicorp Vault, Vernafi etc.
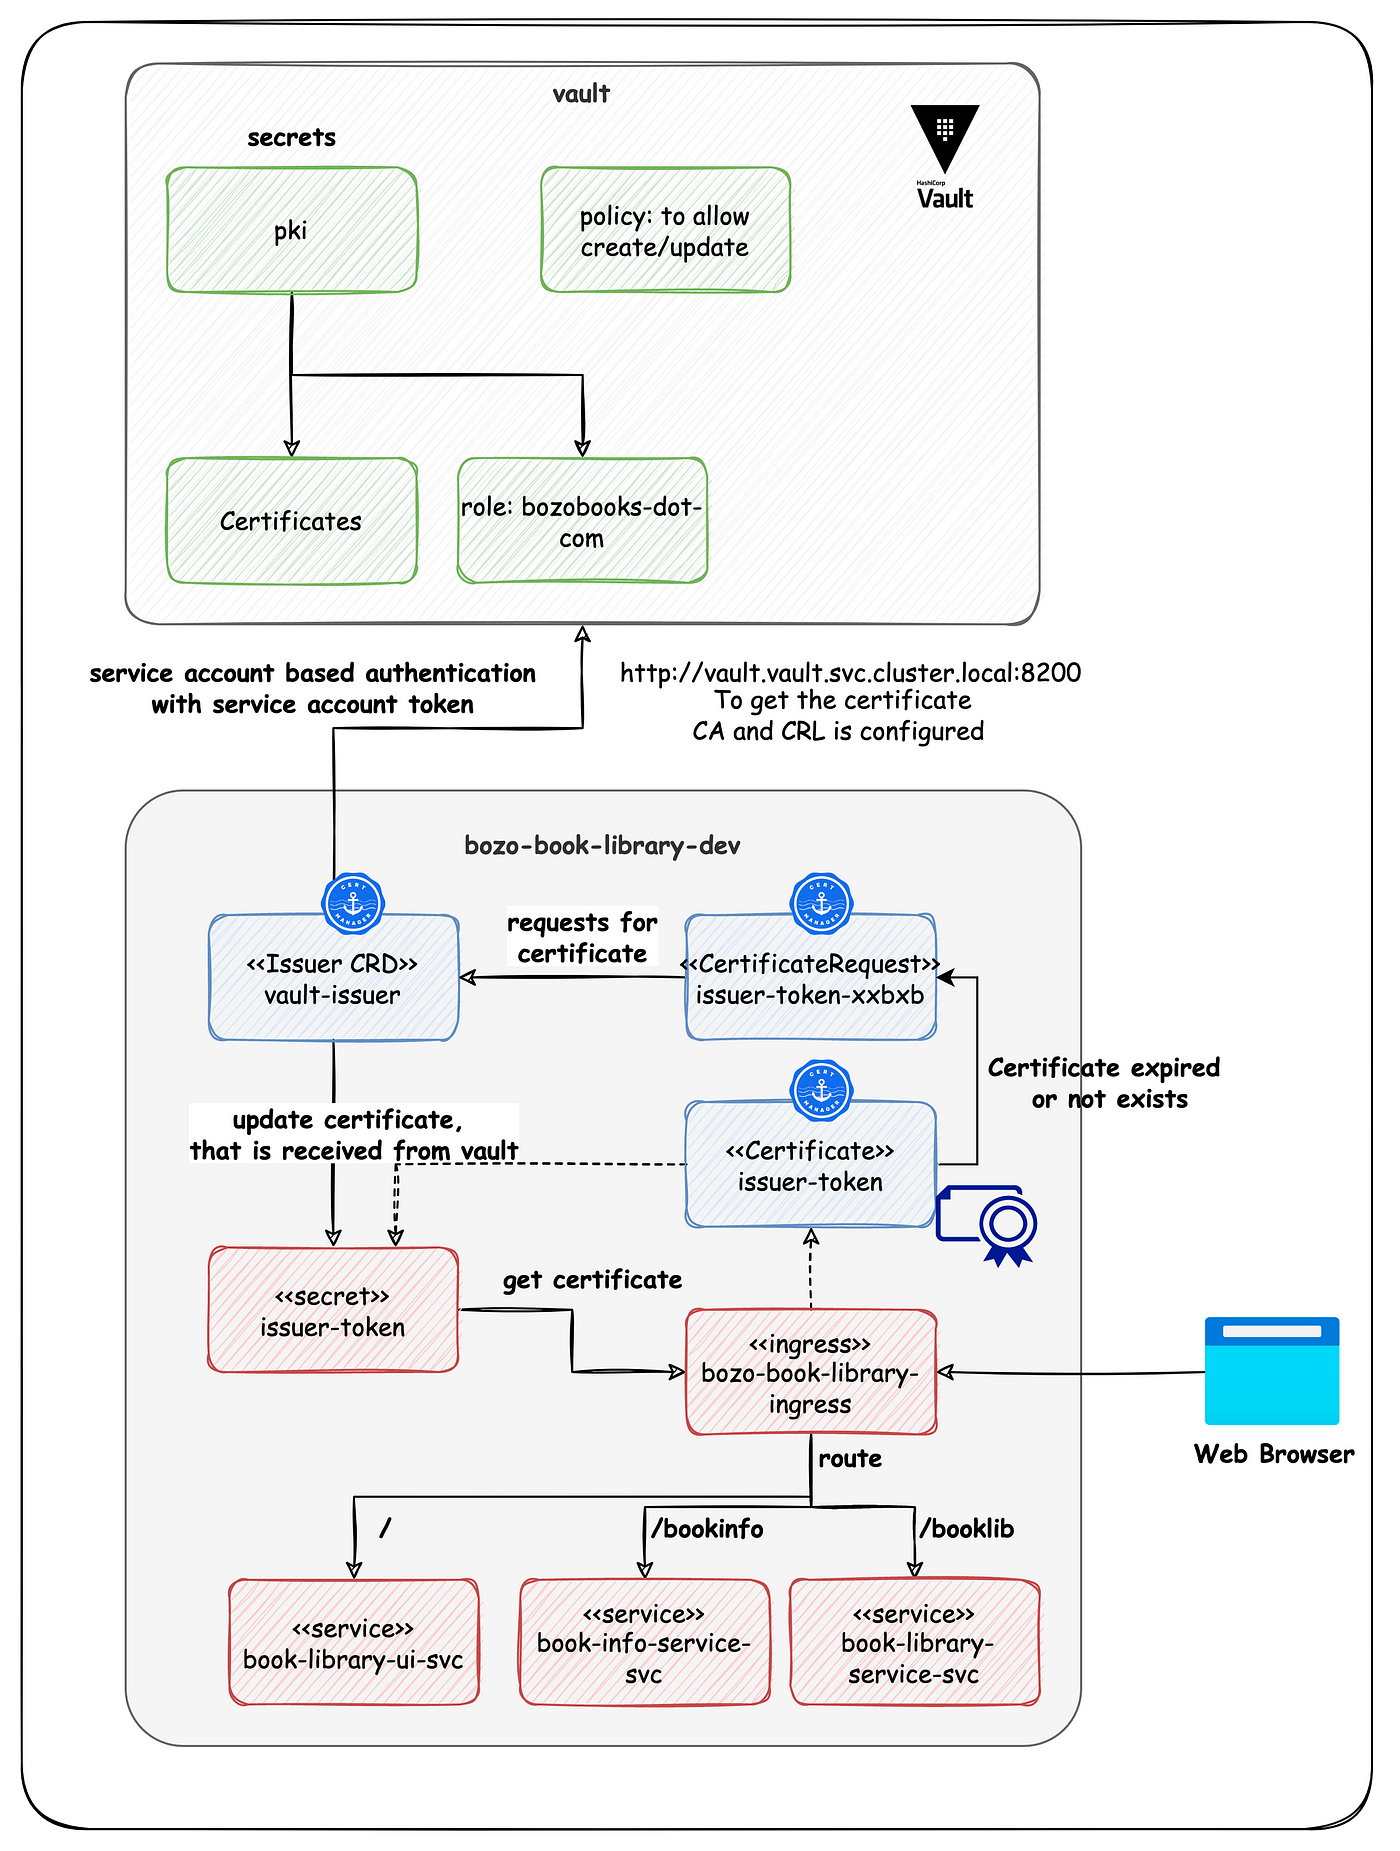
Since we already have a vault cluster in our environment, it makes more sense to integrate cert-manager with Vault public key infrastructure (PKI) secret engine to generate X.509 certificate. cert-manager provides an Issuer interface, which can be used to implement the vault as the certificate issuer. The diagram below shows a very high-level interaction diagram between the cert-manager and the vault, on how the certificates are generated and managed by cert-manager.

1, 2 — When the Certificate is expired or required, the Issuer (custom resource of cert-manager) sends a request to Vault as a CertificateRequest object.
3 — Vault authenticates and validates the Issuer using Kubernetes authentication.
4 — Vault will generate a certificate with intermediate CA once authenticated and validated.
5 — The certificate is passed to the cert-manager
6 — cert-manager stores the certificate as a secret and serves it along with the web page.
In this chapter, we will be setting up the complete infrastructure to implement HTTPS. The following diagram shows how the various resources will come together to provide the HTTPS implementation for our application.
We will be integrating with AWS ACM, in later blogs/chapters. This chapter focuses on the development environment and helps clear the concepts. Before you go any further, make sure you have gone through Chapter 2, where we are setting up the Vault cluster.
Let’s now go through the setup process
1) Setup Vault
Let's configure the public key infrastructure on our vault cluster.
Step 1.1: Log in to the vault pod using the following command
kubectl exec -n vault --stdin=true --tty=true vault-0 — /bin/shStep 1.2: Enable public key infrastructure, by executing the following command inside the vault container
vault secrets enable pkiStep 1.3: Set the maximum lease TTL (time to live). we are setting 365 days (8760 hours) since it's a Dev environment.
vault secrets tune -max-lease-ttl=8760h pkiStep 1.4: Generate the root CA
vault write pki/root/generate/internal \
    common_name=bozobooks.com \
    ttl=8760h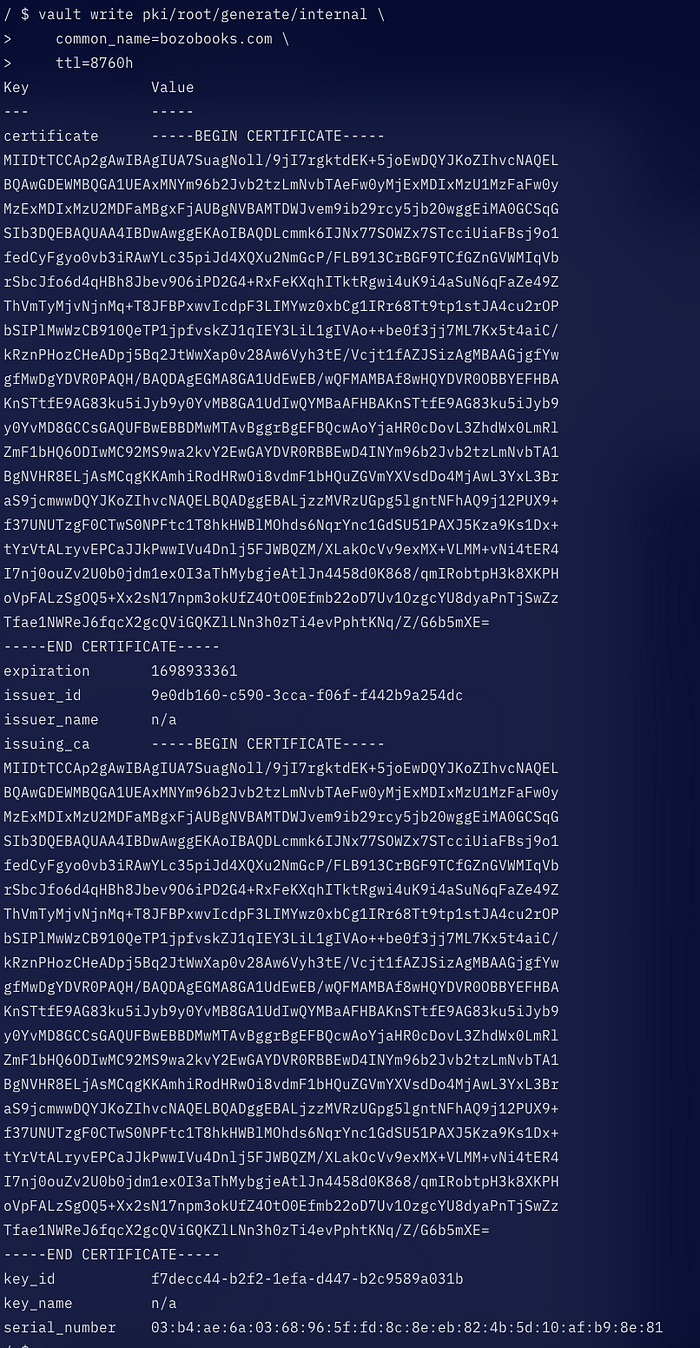
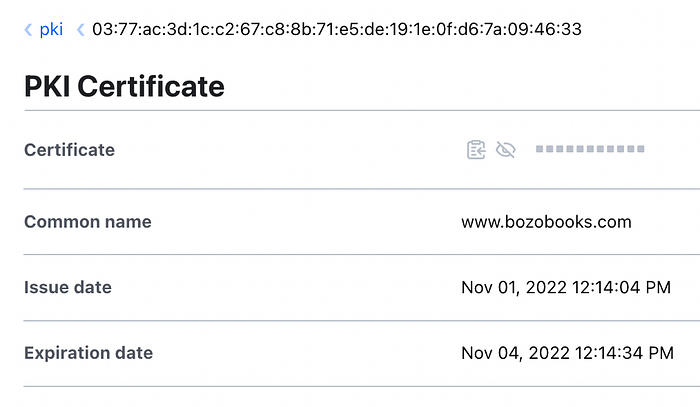
We can check the certificate that is generated in the vault portal. Following is the screenshot Vault portal

Step 1.5: Set the PKI URLs for issuing certificates and certificate revocation list (CRL) distribution point URLs. Both of them will point to the PKI of Vault. The cert-manager will call these URLs to get the certificates and validate certificates that are revoked.
vault write pki/config/urls \
    issuing_certificates=”http://vault.default:8200/v1/pki/ca" \
    crl_distribution_points=”http://vault.default:8200/v1/pki/crl"
Step 1.6: Define the role. Set the allowed domain to bozobooks.com, and also allow subdomains
vault write pki/roles/bozobooks-dot-com \
allowed_domains=bozobooks.com \
allow_subdomains=true \
require_cn=false \
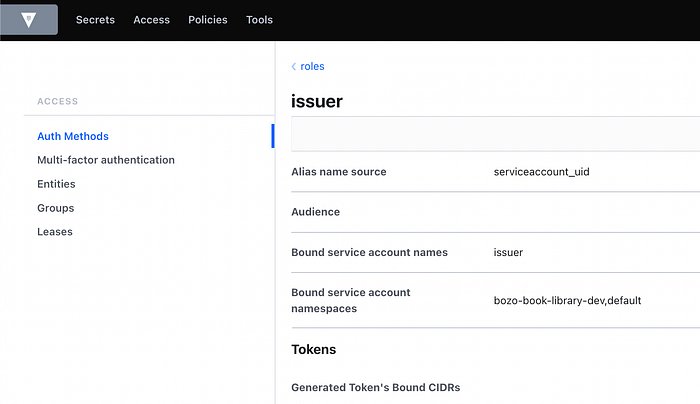
max_ttl=72hStep 1.7: Set the service account for the issuer, please note that the namespace default is already included, we may have to specify bozo-book-library-dev along with that, as we will be having our issuer service account in that namespace
vault write auth/kubernetes/role/issuer \
    bound_service_account_names=issuer \
    bound_service_account_namespaces=bozo-book-library-dev,default
Following is the screenshot on the vault portal
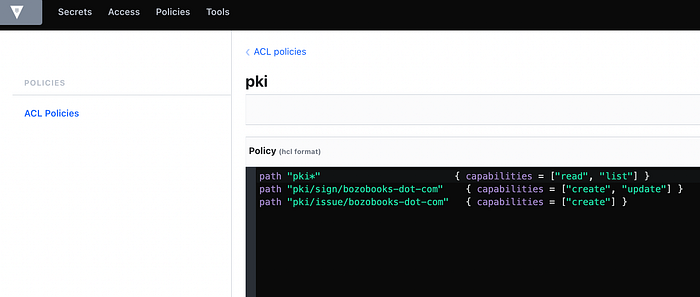
Step 1.8: Define the policy, and provide access.
vault policy write pki — <<EOF
path “pki*” { capabilities = [“read”, “list”] }
path “pki/sign/bozobooks-dot-com” { capabilities = [“create”, “update”] }
path “pki/issue/bozobooks-dot-com” { capabilities = [“create”] }
EOF
The following screenshot shows the policy that is defined, on the Vault portal.
Let’s now install cert-manager
2) Install cert-manager
cert-manager can be installed using the helm chart, by executing the following command. (note that we are also installing the CRDs, which are required for us to define the resources, later in the chapter).
helm upgrade -i --create-namespace -n cert-manager cert-manager jetstack/cert-manager --set installCRDs=trueThis should install the cert-manager CRDs and run the cert-manager pods, as shown in the below screenshot


3) Setup Kubernetes cluster
Step 3.1: Create Service Account
Create the service account issuer that we configured in the vault. Note that the namespace is bozo-book-library-dev, which we had already configured in the previous step
apiVersion: v1
kind: ServiceAccount
metadata:
    name: issuer
    namespace: bozo-book-library-dev
Step 3.2: Create Issuer Secret
Create the issuer-token secret, This will be used by the cert-manager Issuer a resource to connect to the vault. The kubernetes.io/service-account.name suggests the service account to which this secret token is linked.
apiVersion: v1
kind: Secret
metadata:
    name: issuer-token
    namespace: bozo-book-library-dev
    annotations:
        kubernetes.io/service-account.name: issuer
type: kubernetes.io/service-account-token
This creates a secret as shown in the below screenshot
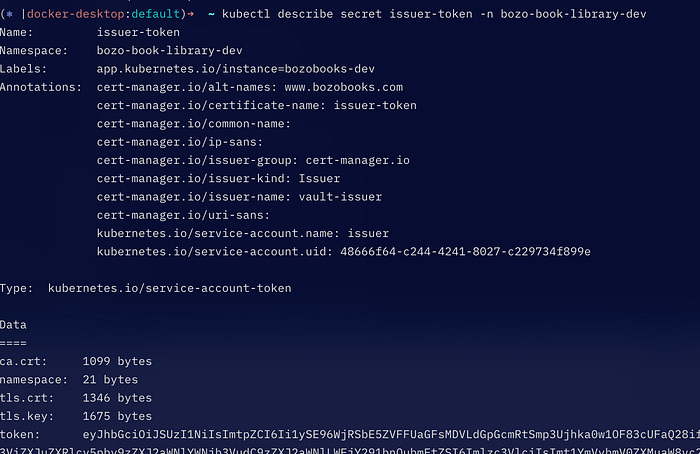
As you can see in the screenshot, cert-manager has added additional annotations and has fetched the ca.crt, ts.crt, tls.key from Vault and populated it into the secret, this is used by the ingress controller, to serve the certificate and handle TLS/HTTPS.
Step 3.3: Create Issuer
Create Issuer resource, This is called by the cert-manager to request the certificate when the certificate is expired/required. We provide the vault details to this resource. We point it to the vault server, provide the path to the PKI that we configured in the previous section, and provide the service account to use (issuer) so that the vault will authenticate the request coming from the Issuer, and provide the generated certificate (as shown in the interaction diagram above)
apiVersion: cert-manager.io/v1
kind: Issuer
metadata:
    name: vault-issuer
    namespace: bozo-book-library-dev
spec:
    vault:
       server: http://vault.vault.svc.cluster.local:8200
       path: pki/sign/bozobooks-dot-com
       auth:
          kubernetes:
              mountPath: /v1/auth/kubernetes
              role: issuer
              secretRef:
                 name: issuer-token
                 key: token
4) Update the hosts file
Since we are using this in the local development environment, we need to make the www.bozobooks.com point to the localhost. To do that, we need to update the hosts file located in /etc. We can do that by executing sudo vi /etc/hosts. The screenshot below shows the entries

Let’s now install and configure Ingress
5) Install Nginx Ingress
We will be using Nginx Ingress. Use the following commands, to install Nginx ingress controller.
kubectl apply -f https://raw.githubusercontent.com/kubernetes/ingress-nginx/controller-v1.3.0/deploy/static/provider/cloud/deploy.yamlhelm upgrade -i --create-namespace -n ingress-nginx ingress-nginx ingress-nginx/ingress-nginx
Once this is installed, We will be defining the ingress for our project as follows.
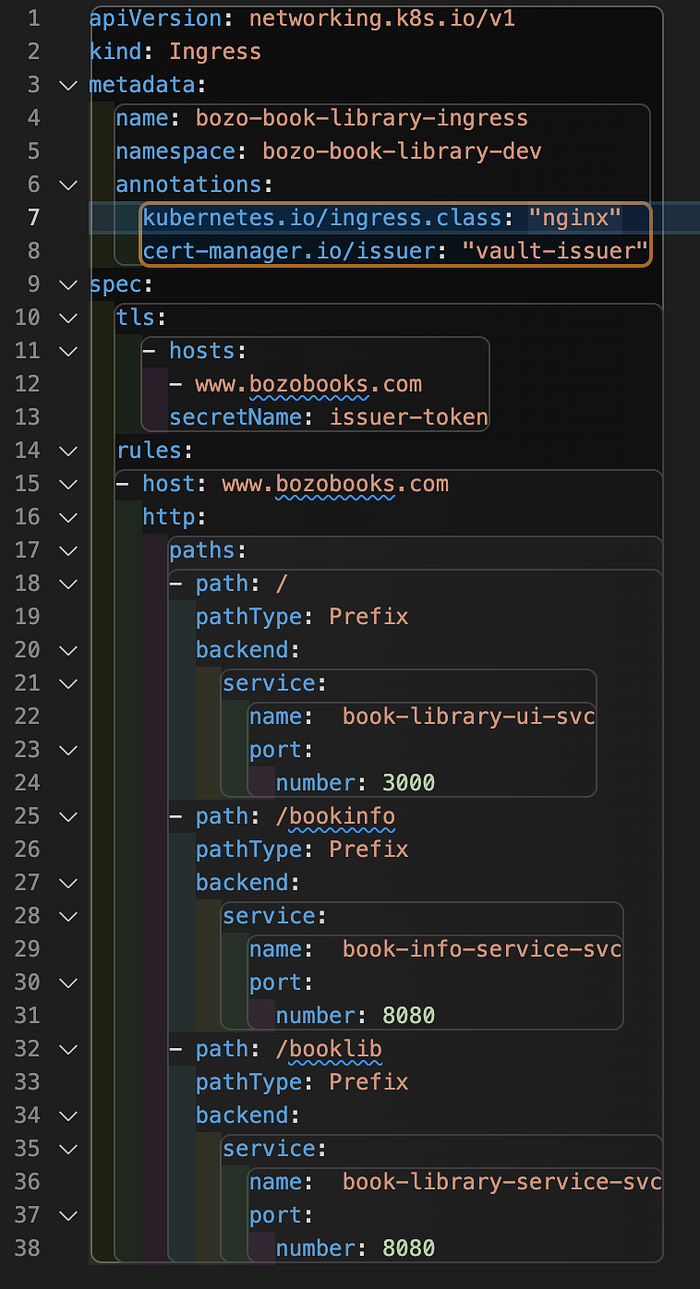
As you can see this is a standard ingress definition, with three paths
/pointing to the ReactJS app, that we developed in Chapter 7/bookinfopointing to the book information microservice service that we developed in Chapter 3/booklibpointing to the book library microservice that we developed in Chapter 6.
An important thing to note is the annotation cert-manager.io/issuer, where we are providing the issuer resource that we defined in previous steps. This is picked up by the cert-manager to use the respective issuer to get the certificate.
Let’s apply this manifest with the following command
kubectl apply -f ingress.yamlNow we should be able to access our portal. Find below the screenshot of our application working, with https://www.bozobooks.com
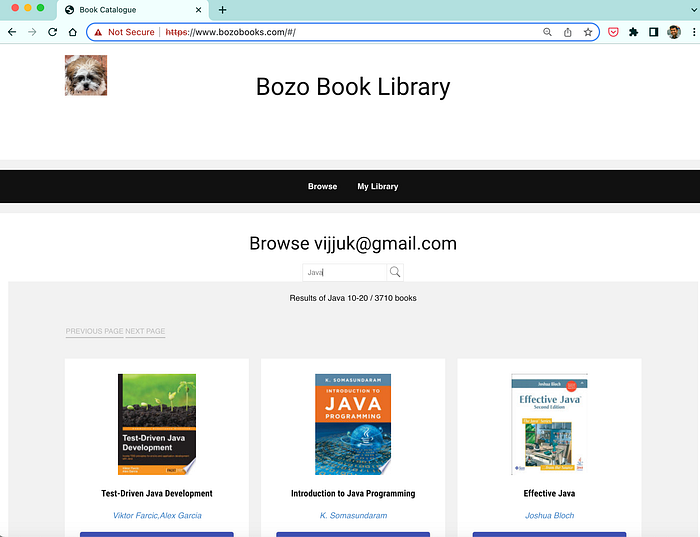
you can see that the site works with HTTPS, though the certificate is not secure, as it is self-signed.
When we move to production, we will be implementing the actual CA, where we will generate a certificate from a proper CA, and will be using AWS ACM.
Finally, we got our application working on the development environment.
Before we move to AWS architecture and deployment, we will go through setting up observability in a development environment, we will be going through this in the next few chapters.
Until then, take care, please leave your feedback and comments
See you soon ;-)
References
- cert-manager — https://cert-manager.io/docs/
- vault — https://www.vaultproject.io/
- PKI — https://developer.hashicorp.com/vault/docs/secrets/pki
- nginx ingress — https://github.com/kubernetes/ingress-nginx